




When you open the National Invoicing System (JoFotara) portal with the main user account, you see the management options but no option to issue an invoice. One step comes before it, and that step is to add a sub-user in JoFotara. The sub-user is the account from which invoices are issued on the portal, and the main user is the account that creates it.
This article walks through the steps as the Income and Sales Tax Department (ISTD) lays them out in its 2026 procedures guide for joining the system, from pressing the Add a sub-user tile (إضافة مستخدم فرعي) to logging in with the new account. It then covers the problems that ISTD’s official questions and answers guide lists for this stage, with the fix ISTD gives for each one.
The difference between the two accounts and what each one is for is explained in our article on the JoFotara sub-user and the main user. Here we stay with the screens and the steps.
What you need before you start
A sub-user can only be added from inside an existing account. Before the first step, check four things.
- A complete main user account. This account is created at registration and is tied to the tax number. If you have not registered yet, start with our article on JoFotara registration.
- An active income-source sequence. The add-user form asks you to choose an income-source sequence. The taxpayer selects the sequence from a list. The system does not generate it.
- Your phone within reach. The system sends a verification code to your phone number before it opens the add-user form.
- Pop-ups enabled in your browser. The joining guide flags this requirement for the move from ISTD’s e-services site to the invoicing system.
Before all of this, one question decides whether you need a sub-user at all. After the account is created, the joining guide sets out two paths. The first is for a business with no accounting software, and it starts with Add a sub-user. The second is for a business that has accounting software, and it starts with the device linking option (ربط الأجهزة). This article covers the first path.
Steps to add a sub-user in JoFotara
In the joining guide, ISTD sums up this stage in four short points under the path for businesses with no accounting software. We break them out here into six steps, in the order the screens appear.
Step 1: Log in with the main user account
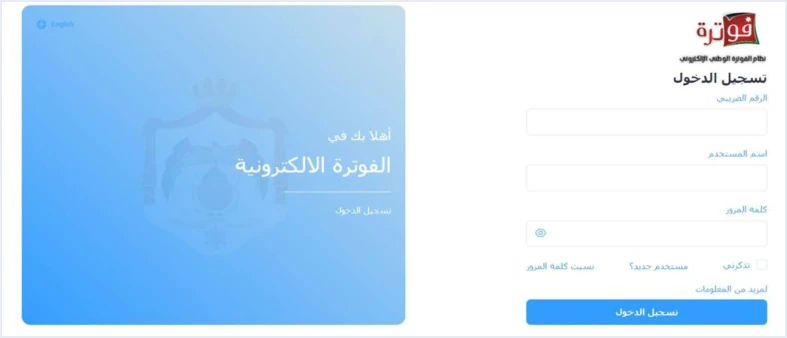
Adding a sub-user starts from the main user account only, because that is the account with the Add a sub-user tile. The main user logs in to the portal with three fields, the tax number, the username and the password. The tax number is filled in automatically when the account is created. The taxpayer chooses the username and password.
Step 2: Press Add a sub-user
After logging in, the main user sees a screen with four tiles. They are Add a sub-user (إضافة مستخدم فرعي), device linking (ربط الأجهزة), View invoices (عرض الفواتير) and Settings (إعدادات). Press the first one.
Under the tiles there is a note. Its exact wording reads as follows.
«لتصدير الفواتير من خلال الموقع الإلكتروني يجب إضافة مستخدم فرعي وتصدير الفواتير من خلاله»
In English, the note says that to issue invoices through the website, a sub-user must be added and the invoices issued from it. The Arabic word the note uses (تصدير) means issuing the invoice here, not exporting goods. ISTD publishes this guide in Arabic only; the English here is our rendering, and the Arabic text is the authority.
So the note states plainly that invoices are not issued on the portal from the main user account.
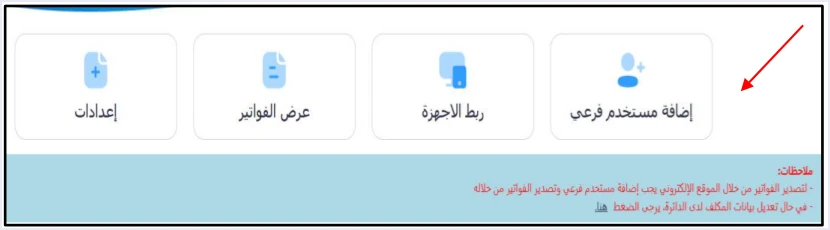
On this screen, notice that the device linking tile sits right next to Add a sub-user. Clicking it by mistake has an effect on the sub-user, which we come back to in the problems section below.
Step 3: Enter the verification code
Before the system opens the add-user form, it asks for a verification code (OTP). ISTD describes this step as entering the verification code sent to your phone number and then pressing Confirm (تأكيد). Type the code into the boxes in the window, then press Confirm.
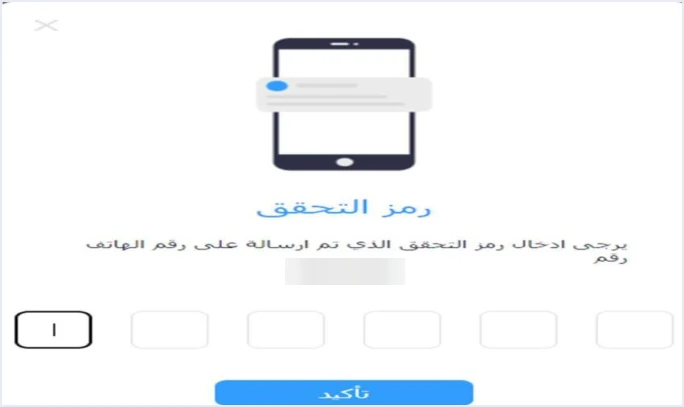
The verification code appears in the 2026 edition of the joining guide. The 2024 user guide for the platform, which a software vendor prepared and ISTD did not, describes adding a sub-user with no verification code. Where the two differ, ISTD’s guide is the one to follow.
Step 4: Fill in the Add user form
Once the code is confirmed, a window titled Add user (إضافة مستخدم) opens. The joining guide sets the order of work in it. First you choose the income-source sequence, then you enter the username and password, and then you press Add (إضافة).
- Income-source sequence (تسلسل مصدر الدخل). A dropdown list where you choose the sequence under which this user will issue invoices.
- Username (اسم المستخدم). The name the sub-user will use to log in to the portal.
- Password (كلمة المرور). The password for the new account. Next to the field is an icon that shows what you type.
- Trade name (الاسم التجاري). This field is filled in automatically and is read-only, so you enter nothing in it.
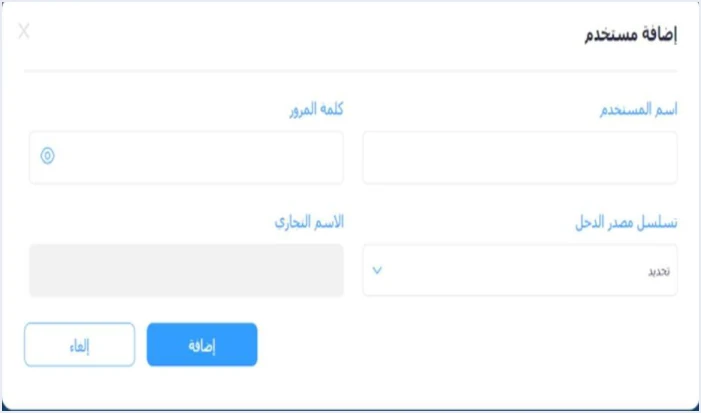
The guide’s screenshot shows a single password field in this window. It shows no second field to retype the password, unlike the account-creation form at registration. So write down the username and password before you press Add, and hand them to the person who will issue invoices from this account.
Step 5: Press Add
When the fields are complete, press Add to create the sub-user, or Cancel (إلغاء) to close the window without saving. The Add a sub-user option itself also has a User status (حالة المستخدم) column. ISTD’s questions and answers guide mentions it when it explains how the main user reactivates a sub-user.
Step 6: Log out and log in as the sub-user
The joining guide says to log out of the main user after adding the sub-user, then log in as the sub-user. On the login screen, use the same tax number together with the username and password you created for the sub-user.
The home screen tells you whether you are in the right account. The sub-user’s screen has only two tiles, Issue an invoice (تنظيم فاتورة) and View invoices (عرض الفواتير). The main user’s screen has four tiles, and Issue an invoice is not one of them. The Issue an invoice tile is where issuing an invoice on the portal begins, and our article on issuing an invoice on the JoFotara portal covers that stage.
The income-source sequence in the add-user form
The most important decision in the whole form is the choice of income-source sequence. A sub-user is bound to one sequence, selected for it when it is created. The sequence is already registered with ISTD, and the taxpayer selects it from the dropdown list.
If a taxpayer has more than one income-source sequence and issues invoices on the portal, each sub-user covers its own sequence only. For that case, the 2024 user guide for the platform describes adding one sub-user for each income-source sequence. That description comes from the platform guide, not from ISTD’s guides, and the current interface may differ from what it describes.
A business with no active income-source sequence gets stuck before this stage. ISTD’s questions and answers guide gives the lack of an active sequence as the reason a taxpayer is sent back to the invoicing home page when trying to register. The fix is a request to ISTD, which we set out in the next section.
Problems you may run into and the official fixes
The questions and answers guide, issued by ISTD’s technical support section, records cases tied to this stage. Here they are, each with the fix that ISTD gives.
- The Issue an invoice tile does not appear at all. The official cause is that you are on the main user’s page. The fix is to create a sub-user, log out, and then log in as the sub-user.
- The sub-user does not see Issue an invoice. The official cause is that someone clicked the device linking option. The fix is an internal service request to ISTD titled invoicing-system support request (طلب دعم فني لنظام الفوترة), and it is available only to a business with no accounting system.
- Trying to register takes you back to the invoicing home page. The official cause is that there is no active income-source sequence. The fix is an internal service request titled opening a new income source and group (فتح مصدر دخل ومجموعة جديدة).
Internal requests are not submitted from the JoFotara portal. They go through ISTD’s e-services site. You log in there with your tax number and password, choose Internal services (الخدمات الداخلية), then Send an internal service request (ارسال طلب خدمة داخلية). You pick the request type, write your note, and send it. You track the request from Follow up on sent internal requests (متابعة الطلبات الداخلية المرسلة).
On the request to unlink devices in particular, ISTD’s questions and answers guide says the following.
«طلب فك ربط الأجهزة يكون فقط لمن ليس لديه نظام محاسبي ويكون قام بالربط عن طريق الخطأ اما من يمتلك نظام محاسبي يلزمه ربط نظامه مع نظام الفوترة»
In English, ISTD says a request to unlink devices is only for a business that has no accounting system and linked by mistake, and that a business with an accounting system must link that system to the National Invoicing System. ISTD publishes this guide in Arabic only; the English here is our rendering, and the Arabic text is the authority.
Undoing the link is therefore not a setting you change yourself. The decision rests with ISTD.
Two more cases concern the sub-user after it has been created. One is the account-suspended message, and the other is a verification code that arrives at an old phone number.
When linking is your path instead of a sub-user
The sub-user is the path for a business that issues its invoices by hand on the portal. A business that has accounting software takes a different path in the joining guide. It uses the device linking option on the main user’s screen to create the Client ID and Secret Key, uses them inside its software, and sends invoices from the software directly. Our article on the JoFotara Client ID and Secret Key covers that step.
Do not press device linking just to see what is behind it if you plan to issue on the portal. ISTD’s questions and answers guide gives a click on it as the cause of Issue an invoice disappearing from the sub-user, and undoing it is a request that ISTD decides on its own terms.
A business that chooses linking moves issuing from the portal to its accounting software. The invoice is then issued in the software and sent to the system without being entered a second time on the portal. For the full picture of the system, read our article Jordan’s National E-Invoicing System. For how this works with Qoyod, see our page Qoyod and the National Invoicing System.
E-invoicing and full accounting in one system
Qoyod is integrated with the National Invoicing System (JoFotara). You issue your invoice in Jordanian dinars from Qoyod, it is booked to your ledgers automatically and sent to the system, and once it is accepted it comes back with a QR code from the Income and Sales Tax Department.
Frequently asked questions
Who can add a sub-user in JoFotara?
Only the main user can add one, from the Add a sub-user tile on its home screen. The sub-user does not have this option. Its screen shows only Issue an invoice and View invoices.
When is the verification code requested when adding a sub-user?
It is requested at the start, after you press Add a sub-user and before the add-user form opens. The code is sent to your phone number, you enter it, and then you press Confirm. This is the sequence set out in the 2026 edition of the joining guide.
Which fields do I fill in on the add-user form?
You choose the income-source sequence from the list, enter the username and password, and then press Add. The trade name also appears on the form, filled in automatically and read-only.
Does the sub-user log in with the same tax number?
Both accounts log in with the same three fields, the tax number, the username and the password. The tax number is the same for both, and the username and password decide which of the two accounts you open.
I added a sub-user but I don’t see Issue an invoice. Why?
ISTD’s questions and answers guide gives two causes for this. If you are still in the main user account, log out and log in as the sub-user. If someone clicked device linking, the fix is to submit an invoicing-system support request to ISTD, which is open only to a business with no accounting system.
Do I need a sub-user if I have accounting software?
The joining guide puts a business with accounting software on the device linking path, not the sub-user path. The main user creates the Client ID and Secret Key, and the software sends invoices to the system directly.
References
- Income and Sales Tax Department (ISTD), procedures guide for joining the Jordanian National Electronic Invoicing System, 2026 edition (in Arabic).
- Income and Sales Tax Department (ISTD), questions and answers guide for the National Invoicing System, 2026 (in Arabic).
- User guide for the National Invoicing System platform, 2024, prepared by a software vendor, not ISTD (secondary source; the current interface may differ from it) (in Arabic).
- ISTD’s National Invoicing System guides (in Arabic)