




You log in to the portal of the National Invoicing System (JoFotara) and a set of options appears, with no hint of what each one opens. The JoFotara home screen is not a single screen. What you see after logging in depends on the account you used. The main user’s account shows four options, and a sub-user’s account shows two.
The short answer is that the main user’s screen carries Add a sub-user (إضافة مستخدم فرعي), device linking (ربط الأجهزة), View invoices (عرض الفواتير) and Settings (إعدادات), while the sub-user’s screen carries Issue an invoice (تنظيم فاتورة) and View invoices (عرض الفواتير). That is what the screenshots in the 2026 edition of the joining procedures guide from the Income and Sales Tax Department (ISTD) show, and ISTD’s questions and answers guide for the same year shows the same main user screen.
This article goes through the options one at a time. For each one it covers what the option opens, what ISTD documents about it, and what comes only from a secondary source, then points to the article that explains the procedure itself in detail. The aim is a map of the screen, not a walkthrough of every step behind it.
Before the JoFotara Home Screen: Where You Log In and With Which Account
This screen appears only after registration is complete and the account has been created. If you have not registered yet, start with our article JoFotara Registration and the Registration Document.
ISTD’s 2026 procedures guide for issuing an invoice lists three ways into the system. The first is through the ISTD website, from the ISTD Services panel (خدمات الدائرة) and then the Registration and linking with the National Electronic Invoicing System tile (التسجيل والربط مع نظام الفوترة الوطني الالكتروني). The second is directly through the portal link. The third is the mobile app, listed in the app stores as JoFotarah. ISTD’s guides do not explain what the app does, so this article covers the portal screen only.
Both accounts log in with the same three fields, which are the tax number, the username and the password. The username and password decide which screen opens. Enter the main user’s details and you see the four options. Enter a sub-user’s details and you see the two.
The Main User’s Screen: Four Options for Administration and Linking
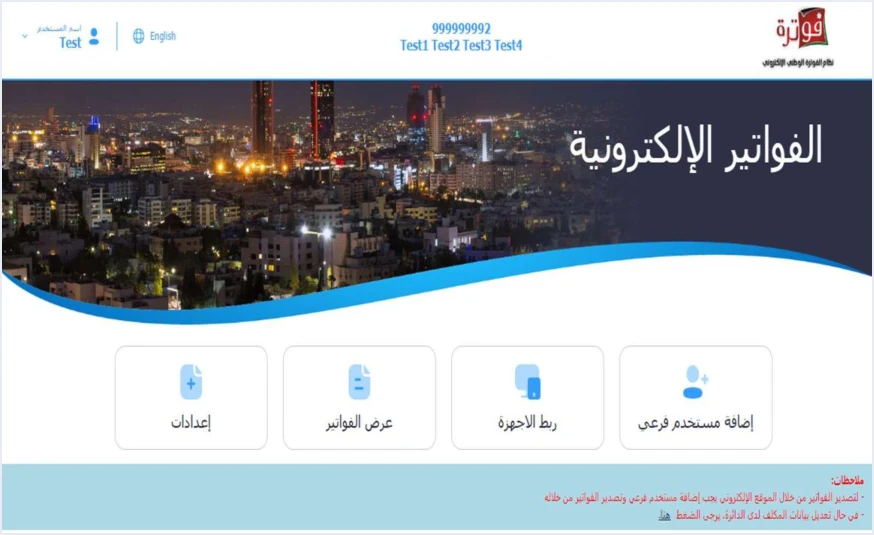
Once the account is created, the main user reaches a screen with four options side by side and a two-line notes banner beneath them. The joining guide shows this screen on page 9, and the questions and answers guide shows it again on page 7.
The Add a Sub-User Option
The Add a sub-user option (إضافة مستخدم فرعي) is the route to issuing on the portal. From here the main user creates the sub-user accounts that issue invoices. In the 2026 edition of the joining guide, the procedure starts with a verification code (OTP) sent to the phone number. It then opens a form with the income-source sequence, the username and the password, along with the trade name, which is filled in automatically and is read-only.
The option has a second job once the sub-user exists. The questions and answers guide makes it the way to reactivate a suspended sub-user. The main user opens Add a sub-user and changes the user’s status from inactive (غير مفعل) to active (مفعل). This is the situation behind the message that the account has been suspended and you should contact the system administrator (تم إيقاف الحساب الرجاء الاتصال بمسؤول النظام).
The full steps, from the verification code to pressing the Add button (إضافة), are in our article Add a Sub-User in JoFotara: Step by Step.
The Device Linking Option
The device linking option (ربط الأجهزة) is the path for a business that has accounting software. The joining guide sets out two paths for the taxpayer. The first begins with the instruction to choose device linking from the home screen. Next comes creating the Client ID (رقم المستخدم) and the Secret Key (المفتاح السري). The last step is completing the technical requirements for linking, in coordination with the system’s programmer or the technical solutions provider the taxpayer works with.
Version 1.5 of ISTD’s technical guide for integrating with the National Invoicing System through the API shows what this option opens. A list of existing links appears, with columns for the user, the user status, the Client ID, the Secret Key and the income-source sequence, together with a New link button (ربط جديد). From that button the taxpayer enters a username and selects the income-source sequence, and the system generates the two values. The steps are in our article JoFotara Client ID and Secret Key: Device Linking Steps.
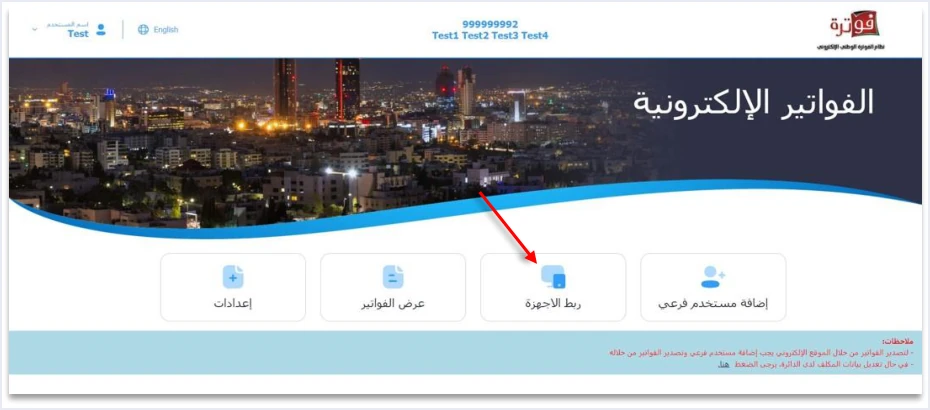
This option has an effect you should know about before you click it. The questions and answers guide traces the disappearance of Issue an invoice from the sub-user’s screen to a click on device linking. The 2024 user guide for the platform describes a warning message that appears when you link. Its text reads as follows.
«لن يتمكن المكلف من تنظيم الفواتير باستخدام المنصة اذا قام بالربط مع الاجهزة»
In English, the warning says that the taxpayer will not be able to issue invoices using the platform after linking with devices. That user guide was prepared by a software vendor, not ISTD, and the current interface may differ from what it describes.
Undoing the link is not a button on the screen. It is a technical support request submitted to ISTD, and ISTD limits it to a business that has no accounting system and linked by mistake. At the same point, the questions and answers guide adds the following.
«اما من يمتلك نظام محاسبي يلزمه ربط نظامه مع نظام الفوترة»
In English, ISTD says that a business that has an accounting system must link that system to the invoicing system.
The View Invoices Option
The View invoices option (عرض الفواتير) opens the invoices that have been issued. It is the only option that appears on both accounts’ screens. The joining guide’s screenshots show it on both screens, but ISTD’s 2026 guides do not set out what each account can see in it.
The 2024 user guide for the platform covers this point, and the current interface may differ from it. According to that guide, View invoices for the main user shows all the invoices of the tax number across income-source sequences, whether they were issued on the platform, through the mobile app or through device linking. The same guide mentions searching invoices, exporting them to an Excel file and printing them, and its interface shows a note that up to 100,000 invoices may be downloaded.
The Settings Option
The Settings option (إعدادات) appears on the main user’s screen in the 2026 screenshots, but none of ISTD’s three guides describes what it contains. According to the 2024 user guide for the platform, and the current interface may differ, the main user uses it to upload the business logo separately for each income-source sequence. That guide gives specifications for the logo, namely the PNG, JPG and JPEG formats, a size of 1MB and dimensions of 300×300. ISTD has not confirmed them in its current guides.
The Notes Banner Under the Options
Under the four options there is a banner titled Notes (ملاحظات) with two lines. The first line reads as follows.
«لتصدير الفواتير من خلال الموقع الإلكتروني يجب إضافة مستخدم فرعي وتصدير الفواتير من خلاله»
In English, the note says that to issue invoices through the website you must add a sub-user and issue the invoices from it. The Arabic word the note uses («تصدير») usually means exporting. Here it means issuing the invoice, not export invoices for sales outside Jordan.
The second line reads as follows.
«في حال تعديل بيانات المكلف لدى الدائرة، يرجى الضغط هنا»
In English, it asks you to click here (هنا) if the taxpayer’s details held by ISTD have been changed. The joining guide does not explain what that link opens, so this article does not describe where it leads.
Why Issue an Invoice Does Not Appear on the Main User’s Screen
A taxpayer may open the home screen for the first time and find no option for issuing an invoice. This is not a fault, and ISTD gives it a question of its own. The questions and answers guide answers the question of why Issue an invoice (تنظيم فاتورة) does not appear by saying that you are on the main user’s page. The fix is to create a sub-user, log out and log in with it.
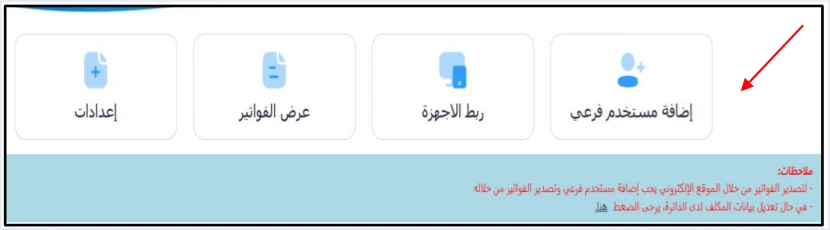
The screenshot the guide places with this answer points to Add a sub-user, not to any other option. The split of work is deliberate. The main user manages the accounts and the linking details, and the sub-user issues the invoices. The difference between the two accounts and what each can do is explained in our article JoFotara Sub-User vs Main User: Roles and Permissions.
The Sub-User’s Screen: Two Options for Issuing and Viewing
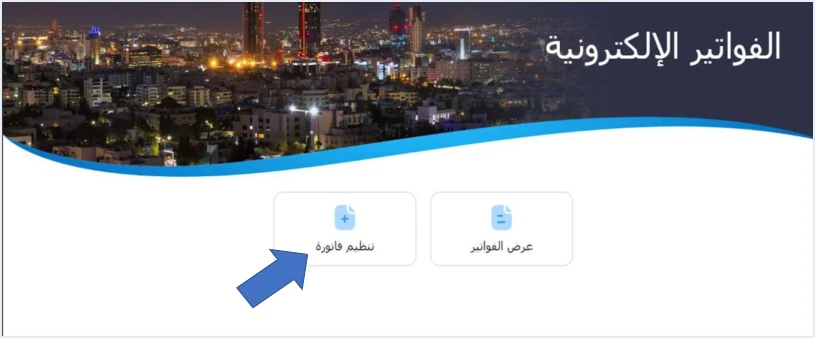
When you log in with a sub-user’s details, a screen with only two options appears, Issue an invoice (تنظيم فاتورة) and View invoices (عرض الفواتير). None of the administration options appears on this screen. There is no adding users, no device linking and no Settings.
The Issue an Invoice Option
This is the option for issuing on the portal, and only the sub-user sees it. It opens the New invoice screen (فاتورة جديدة). There the user chooses the payment type, either Cash (نقدي) for an invoice that has been paid or Receivable (ذمم) for an invoice to be paid later. The user then fills in the invoice and buyer details, adds each good or service with the Add button (إضافة) and presses Issue (إصدار).
This only describes what the option opens. The detailed steps and the pre-issue checklist are in our article Issue an Invoice on the JoFotara Portal: The Steps.
Returns are tied to this option too. ISTD’s questions and answers guide states that the platform lets you return invoices sent through it in all cases, whether or not the business has linked a system. The 2024 user guide for the platform describes the route as Issue an invoice and then Return invoice (فاتورة ارجاع). That description comes from the software vendor, and the current interface may differ from it.
The View Invoices Option for a Sub-User
The option has the same name as the one on the main user’s screen, but its scope is different according to the 2024 user guide for the platform. That guide says a sub-user sees only the invoices issued through that sub-user and cannot view the invoices of other sub-users. This comes from the secondary vendor guide, not from ISTD’s guides, and the current interface may differ from it.
If this description holds for the current portal, a reviewer who needs to see all of the business’s invoices starts from the main user’s account, not from one employee’s account. Check this on your own account before you build an internal control procedure on it.
How to Tell Which Screen You Are On in Three Checks
This is a quick reading of the screen based on the screenshots in ISTD’s 2026 guides. It helps you identify the account you logged in with before you go looking for an option that is not there.
- The number of options. Four options mean you are on the main user’s account, and two mean you are on a sub-user’s account.
- Whether Issue an invoice is there. If it appears, you are on an account that can issue on the portal. If it is missing from a screen that shows Add a sub-user, you are on the main user’s account, and the fix is to log out and log in as a sub-user.
- Issue an invoice missing from a sub-user’s screen. This is a different case. The questions and answers guide links it to a click on device linking, and the fix is a technical support request to ISTD, under the condition described above. It is not a setting you change yourself.
If the notes banner appears under the options, it reminds you of the same rule, which is that issuing on the website goes through a sub-user.
Which Option Is Yours, Depending on Your Business’s Path
After the account is created, the joining guide splits taxpayers into two paths, and it does not ask a taxpayer to follow both. Each path has an option on the main user’s screen where it starts.
If you have accounting software, your option is device linking. From it you create the Client ID and the Secret Key and use them inside your software so it sends invoices to the system directly. The guide asks you to keep the linking details in a safe place and not to share them with anyone. View invoices stays on your screen as well.
If you do not have accounting software, your option is Add a sub-user. From it you create an account bound to an income-source sequence, then log out and log in with it to find Issue an invoice on its screen. Do not press device linking on this path, because undoing its effect on Issue an invoice takes a request to ISTD.
Settings is not tied to either path in ISTD’s guides. If you are still weighing the two paths, our article National Invoicing Portal in Jordan: When It Is Enough and When You Need an Accounting System compares them. For a wider view of the system and how to connect your business to it, read our article Jordan’s National E-Invoicing System. What Qoyod offers a business that chooses the linking path is on our page Qoyod’s integration with the National Invoicing System.
E-invoicing and full accounting in one system
Qoyod is integrated with the National Invoicing System (JoFotara). You issue your invoice in Jordanian dinars from Qoyod, it is booked to your ledgers automatically and sent to the system, and once it is accepted it comes back with a QR code from the Income and Sales Tax Department.
Frequently asked questions
Which options appear on the JoFotara home screen?
The main user sees four options, which are Add a sub-user (إضافة مستخدم فرعي), device linking (ربط الأجهزة), View invoices (عرض الفواتير) and Settings (إعدادات). A sub-user sees two, which are Issue an invoice (تنظيم فاتورة) and View invoices, according to the screenshots in the 2026 edition of the joining guide.
Why can’t I find the option to issue an invoice after logging in?
The questions and answers guide says that you are on the main user’s page, and that screen has no Issue an invoice option. Create a sub-user from Add a sub-user, then log out and log in with the sub-user’s details.
Can I undo device linking from the home screen?
No, the screen has no option for undoing the link. You submit a technical support request to the Income and Sales Tax Department through its e-services website, and ISTD limits it to a business that has no accounting system and linked by mistake.
What is inside the Settings option?
ISTD’s 2026 guides do not describe what this option contains. The 2024 user guide for the platform says it is used to upload the business logo for each income-source sequence, and the current interface may differ from what it describes.
Does a sub-user see all of the business’s invoices in View invoices?
ISTD’s guides do not say what this option covers. The 2024 user guide for the platform says a sub-user sees only the invoices issued through that sub-user, while the main user sees all the invoices of the tax number, so check this on your own account.
References
- Income and Sales Tax Department (ISTD), procedures guide for joining the Jordanian National Electronic Invoicing System, 2026 edition (in Arabic).
- Income and Sales Tax Department (ISTD), procedures guide for issuing an invoice in the Jordanian National Electronic Invoicing System, 2026 edition (in Arabic).
- Income and Sales Tax Department (ISTD), questions and answers guide for the National Invoicing System, 2026 (in Arabic).
- Income and Sales Tax Department (ISTD), technical guide for integrating with the National Invoicing System through the API, version 1.5 (in Arabic).
- User guide for the National Invoicing System platform (2024), prepared by a software vendor, not ISTD (secondary source; the current interface may differ from it) (in Arabic).
- ISTD’s National Invoicing System guides (in Arabic)