




On the portal of the National Invoicing System (JoFotara), you can only issue an invoice on the JoFotara portal from a sub-user account, and only from the Issue an invoice tile (تنظيم فاتورة). After that tile you choose whether the invoice is cash or receivable, fill in the invoice and buyer details, add the lines one at a time, and press Issue (إصدار).
These are the steps as they appear in the procedures guide for issuing an invoice in the Jordanian National Electronic Invoicing System, 2026 edition, published by the Income and Sales Tax Department (ISTD). This article walks through each step in the order it appears on screen. It also covers what you need before you start, the rules the guide sets while you fill in the form, and what follows once you press Issue.
What you need before you issue an invoice on the JoFotara portal
The steps do not start at the invoice form. Three conditions come first, and if any one of them is missing you will not reach the form at all.
- An account registered in the system. Registration creates the main user (Admin) account, which is tied to the business’s tax number. If you have not registered yet, registration comes first, and it has its own article in this series.
- A sub-user. The main user creates it from the Add a sub-user tile (إضافة مستخدم فرعي). Each sub-user is bound to one income-source sequence, which is selected when the sub-user is created.
- The sub-user’s login details. These are the username and password set when the sub-user was created, together with the business’s tax number.
The second condition has a detail that matters to anyone opening the portal for the first time. The main user’s home screen has four tiles, Add a sub-user (إضافة مستخدم فرعي), device linking (ربط الاجهزة), View invoices (عرض الفواتير) and Settings (إعدادات). Issue an invoice is not one of them. That is why the note written under these tiles says that issuing invoices from the website requires adding a sub-user and issuing through it.
The difference between the two accounts, and what each one can do, has its own article in this series. So do the steps for creating the sub-user itself.
Where to find the Issue an invoice tile
ISTD’s guide for issuing an invoice lists three ways into the system.
- ISTD’s website. Go to the Income and Sales Tax Department website, then, in the Department services section (خدمات الدائرة), choose Registration and linking with the National Electronic Invoicing System (التسجيل والربط مع نظام الفوترة الوطني الالكتروني).
- The portal link directly. Open the login page at portal.jofotara.gov.jo without going through ISTD’s website.
- The mobile app. It is listed in the app stores as JoFotarah. The guide only says that the app is available there and does not explain its steps.
Every step in this article is a portal step, as the guide shows it.
Alongside these three ways in there is another path that never passes through the Issue an invoice screen at all. That path is linking accounting software to the system from the device linking option (ربط الاجهزة). When the portal is enough and when a business needs an accounting system is the subject of our article National Invoicing Portal in Jordan: When It Is Enough and When You Need an Accounting System.
Steps to issue an invoice on the JoFotara portal
The seven steps below follow the order of ISTD’s guide, from the login screen to the Issue button.
1. Log in as the sub-user
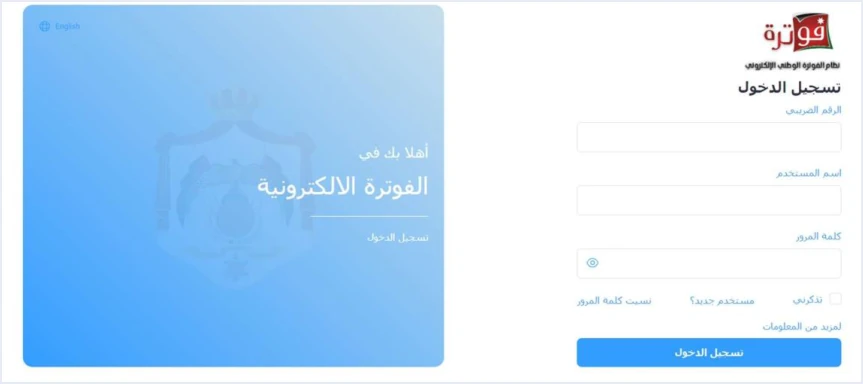
The login screen asks for three fields, the tax number, the username and the password. Enter the business’s tax number, then the sub-user’s username and password.
The main user logs in with the same three fields, and the tax number is the same in both cases. So the username and password are what decide which account you open. If you are logged in as the main user, log out first, then log in with the sub-user’s details.
2. Choose Issue an invoice
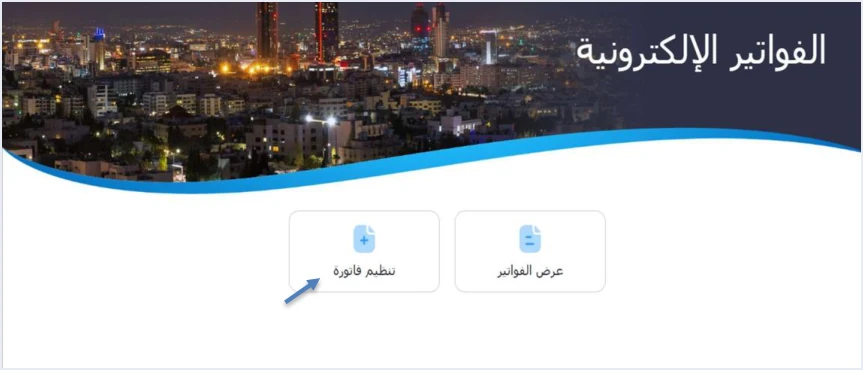
The sub-user sees a home screen with only two tiles, Issue an invoice (تنظيم فاتورة) and View invoices (عرض الفواتير). Press Issue an invoice to start a new invoice.
If you are on a sub-user and this tile is missing, the cause given in ISTD’s questions and answers guide is that someone clicked device linking (ربط الاجهزة). Undoing the link is not a setting you change yourself. It is an invoicing-system support request (طلب دعم فني لنظام الفوترة) that you submit to ISTD, and ISTD reserves that request for a business that has no accounting system and linked by mistake.
3. Decide whether the invoice is cash or receivable
After Issue an invoice, the system asks you to choose between two types, based on how the invoice is paid.
- Cash (نقدي). An invoice whose value is paid at the time of sale.
- Receivable (ذمم). An invoice whose value has not been paid yet and falls due later.
This choice directly affects the buyer details in step 5, so settle it before you start filling in the form.
4. Fill in the invoice details
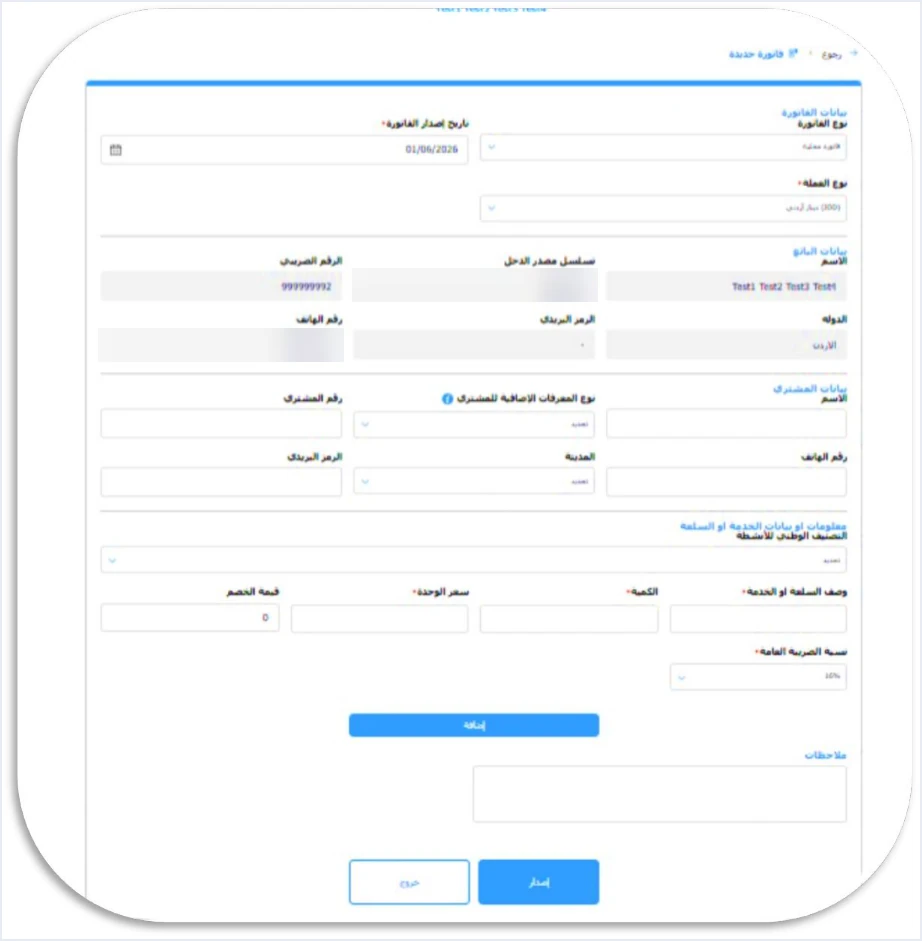
Next, the New invoice form (فاتورة جديدة) appears. At the top is the Invoice details section (بيانات الفاتورة), which has three fields.
- Invoice type (نوع الفاتورة). A dropdown whose default value is local invoice (فاتورة محلية).
- Invoice issue date (تاريخ إصدار الفاتورة). A mandatory field.
- Currency (نوع العملة). A mandatory field whose default value is the Jordanian dinar.
The invoice type is not a formality. The guide lists six types, each with its own use case, among them the export invoice and the development zones invoice. If your sale is not a local sale, read our article Invoice Types in the National Invoicing System before you change the default value.
As for the issue date, Regulation No. 34 of 2019 on Organizing and Controlling Invoicing Affairs, as amended, makes the time and date of the invoice the time and date on which the sale takes place (Article 3), and requires the seller to issue the invoice when the sale takes place (Article 5).
Below this section is the Seller details section (بيانات البائع). It holds the name, the income-source sequence, the tax number, the country, the postal code and the phone number. These fields are filled in automatically from your account and cannot be edited on the form.
5. Enter the buyer details
The Buyer details section (بيانات المشتري) has the name, the buyer additional-ID type (نوع المعرفات الإضافية للمشتري), the buyer number, the phone number, the city and the postal code. The most important rule in this section concerns the buyer’s name, and the guide ties it to your choice in step 3.
- On a receivable invoice. The buyer’s name is always required, whatever the invoice value.
- On a cash invoice. The buyer’s name is required if the invoice value is more than JOD 10,000.
If you enter the buyer’s phone number, the guide requires digits only, with at least 9 digits and at most 14.
6. Add the goods or services lines and press Add
The last section of the form is titled Goods or services details (معلومات او بيانات الخدمة او السلعة). Here you write the description of the good or service, the quantity and the unit price. You choose the General Sales Tax rate from a list, and you enter the discount value if there is one. The discount defaults to zero.
Every field marked with an asterisk on the form is mandatory, as the guide states. In this section those are the description, the quantity, the unit price and the General Sales Tax rate. Above them sits a national activity classification field (التصنيف الوطني للأنشطة) with no asterisk, and ISTD’s guides do not explain its values.
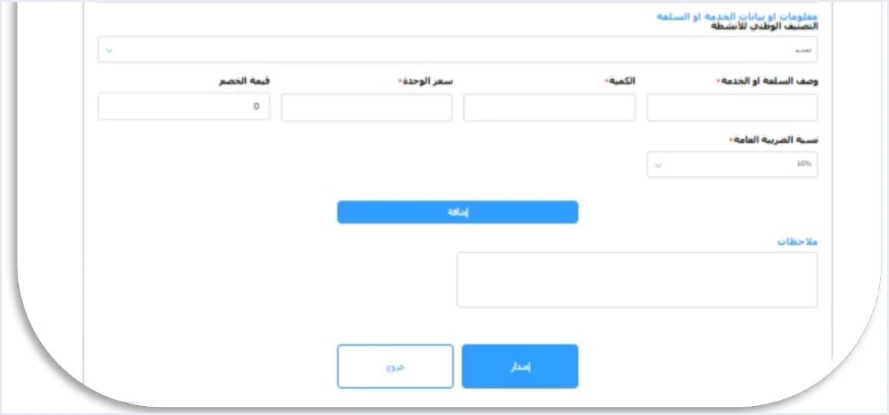
Once the line is filled in, press Add (إضافة) to insert it into the invoice. Then repeat for every other good or service, one line after another. The button adds the current line to the invoice. It does not issue the invoice.
Under the lines is a Notes box (ملاحظات) for free text if you need it. A detailed explanation of every field on the form has its own article in this series.
7. Press Issue
Once all the lines are added and the details are checked, press Issue (إصدار). Next to it is an Exit button (خروج) for leaving the form. The steps shown in ISTD’s guide for issuing an invoice end at the Issue button.
What happens after you press Issue
ISTD’s guide for issuing an invoice stops at the Issue button and does not show the screen that follows. ISTD’s other guides, however, make three points about the invoice once it has been issued.
The QR code
The technical guide for integrating with the National Invoicing System through the API, version 1.5, is addressed to systems linked to JoFotara. It states that the QR code comes back from ISTD with an accepted invoice and does not come back with a rejected one. So the seller does not generate the code. The system issues it after the invoice is accepted, and it must be shown on the seller’s invoice.
The taxpayer verifies the code only by scanning it in the Sanad app, from the Digital document verification option (التحقق من المستندات الرقمية). If the document is valid, the app displays the basic invoice data held inside the code, including the invoice’s total value, its number and its date.
Viewing issued invoices
The second tile on the sub-user’s screen is View invoices (عرض الفواتير), and it is where you reach the invoices you have issued. The same tile also appears on the main user’s screen.
An issued invoice cannot be edited
An invoice cannot be edited after it is issued. The alternative the system offers is a return invoice (credit note). ISTD’s questions and answers guide states that the platform lets you return invoices sent through it in all cases, whether or not the business has linked a system. The alternative available for each kind of mistake is explained in our article Editing an Issued Invoice in Jordan’s National Invoicing System.
Checklist before you press Issue
Because an invoice cannot be edited once it is issued, checking it before you press the button costs less than any correction afterward. Go through these points in order.
- Check the account. You are logged in as the sub-user bound to the right income-source sequence, because the income-source sequence appears in the seller details.
- Check the payment method. You chose cash or receivable according to what actually happened in the sale.
- Check the invoice type. Local invoice for a sale inside Jordan, and another type if the sale is an export or if the buyer is, for example, a taxpayer registered in the development zones.
- Check the buyer’s name. It is entered on every receivable invoice and on every cash invoice worth more than JOD 10,000.
- Check the lines. Every good or service was added with the Add button, and the quantity, unit price and discount are correct.
- Check the General Sales Tax rate. The rate chosen for each line is the rate the law sets for that good or service.
This check repeats with every invoice issued on the portal. A business that issues its invoices from accounting software linked to the system does not go through these screens, and you can see how that works with Qoyod on the page Qoyod and the National Invoicing System. For a wider view of the system and how to connect your business to it, read our article Jordan’s National E-Invoicing System.
E-invoicing and full accounting in one system
Qoyod is integrated with the National Invoicing System (JoFotara). You issue your invoice in Jordanian dinars from Qoyod, it is booked to your ledgers automatically and sent to the system, and once it is accepted it comes back with a QR code from the Income and Sales Tax Department.
Frequently asked questions
How do I issue an invoice on the JoFotara portal?
You log in to the portal as the sub-user, press Issue an invoice (تنظيم فاتورة) and choose cash or receivable. Then you fill in the invoice and buyer details, add each line with the Add button (إضافة), and press Issue (إصدار).
Why can’t I issue an invoice from the main user account?
The main user’s screen has no Issue an invoice tile, because issuing on the portal is done by the sub-user. Create a sub-user from the Add a sub-user tile (إضافة مستخدم فرعي), then log out and log in with it.
When is the buyer’s name mandatory on the invoice?
ISTD’s guide for issuing an invoice requires the buyer’s name on every receivable invoice. It also requires it on a cash invoice when the invoice value is more than JOD 10,000.
Can an invoice be edited after it is issued?
An invoice cannot be edited after it is issued, and the alternative the system offers is a return invoice (credit note). The platform lets you return invoices sent through it in all cases, as ISTD’s questions and answers guide states.
Can I issue the invoice from my phone?
ISTD’s guide for issuing an invoice lists an official app, found in the app stores as JoFotarah, among the ways into the system. It does not explain how to issue an invoice from the app, and every step it does explain is a portal step.
How do I verify the QR code on the invoice?
You scan the code with the Sanad app, from the Digital document verification option (التحقق من المستندات الرقمية), which is the only route named in the system’s technical guide. If the document is valid, the app displays the basic invoice data held inside the code.
References
- Income and Sales Tax Department (ISTD), procedures guide for issuing an invoice in the Jordanian National Electronic Invoicing System, 2026 edition (in Arabic).
- Income and Sales Tax Department (ISTD), procedures guide for joining the Jordanian National Electronic Invoicing System, 2026 edition (in Arabic).
- Income and Sales Tax Department (ISTD), questions and answers guide for the National Invoicing System, 2026 (in Arabic).
- Income and Sales Tax Department (ISTD), technical guide for integrating with the National Invoicing System through the API, version 1.5 (in Arabic).
- Regulation No. 34 of 2019 on Organizing and Controlling Invoicing Affairs, as amended, consolidated text (in Arabic), Articles 3 and 5.
- ISTD’s National Invoicing System guides (in Arabic)